How to Dual Boot Ubuntu alongside Windows 10
Looking for guide on how to dual boot Ubuntu with Windows 10. Then, here is step by step to install any linux distribution like Ubuntu with Windows 10 in 2021.
Multi-booting is the process of installing multiple operating system on a single computer. The term dual-booting refers to the common configuration of specifically two operating systems.
Technically, you can dual boot or multi boot any OS not just Windows and Linux. You can have Linux with other Linux distribution or Windows with other version of Windows. In this guide, we will show you how you can dual boot Linux along side Windows 10.
Before we get started, make sure have a USB flash drive (8GB or more) for installation media, have a live or recovery disk of Windows ready (in case something goes wrong and you are unable to boot into system) and have backed up your data (in case you accidently deleted the wrong partition).
So, lets get started.
Installing Ubuntu alongside Windows 10
Create a Linux installation media
Find and download the Linux distribution that you want to use. For this guide, we will be using Ubuntu 20.04.3. The steps for dual booting Linux with windows are pretty much same, irrespective of which distribution you choose.
Next download the ISO file of the Linux distribution.
Once downloaded, download Rufus for creating live installation media.
Insert your USB flash drive and then run Rufus. You will now see a screen like this.
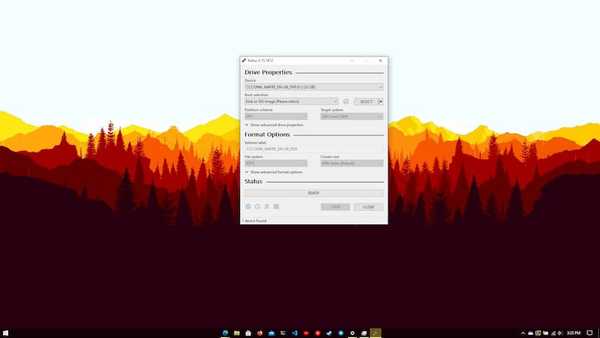
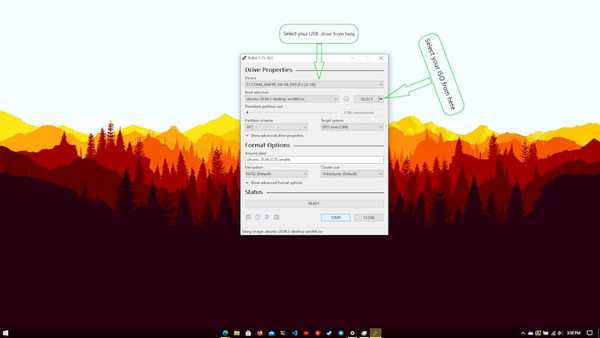
Under Device section, select your USB Flash drive that you just connected.
Under Boot Selection, click on the select icon and locate the file where your Linux ISO is located.
- Check if your PC has UEFI or Legacy BIOS. To check, search for System Information and open the application, it will show you whether you have UEFI or Legacy BIOS.
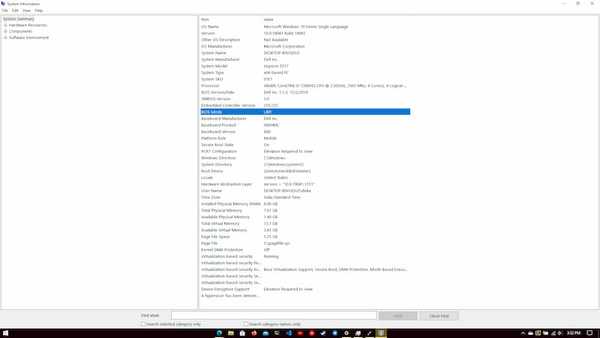
For UEFI enabled Devices, change the Partition Scheme to GPT and target system to UEFI(non CSM), and for Legacy BIOS devices change Partition scheme to MBR and target system to BIOS or UEFI.
After that leave everything as it is and click on start, then click OK in the prompt that shows up. Let the process complete then you will have your Linux installation media ready. 10. Now its time to move on to the next stage.
Create Space on your disk for your Linux installation
(Important) For Devices having MBR Partition Table: Trying to create too many partitions ( 4 or more) on a machine with MBR partition table will convert the Disk type to Dynamic, which will cause your system to become unbootable, because windows doesn't support booting from Dynamic partition. So before shrinking volumes, make sure that numbers of partitions already available on you Disk should be less than 3.
To create space for installation of Linux you need to shrink your volume. To do that, press Window key + R and type diskmgmt.msc in the application. This will get you to your Disk Management.
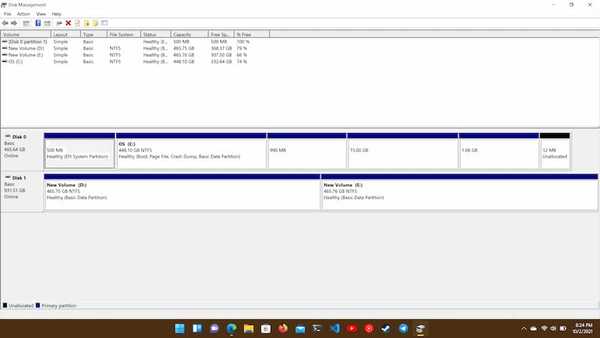
Select the partition you want to shrink and right click on the partition and select shrink volume.
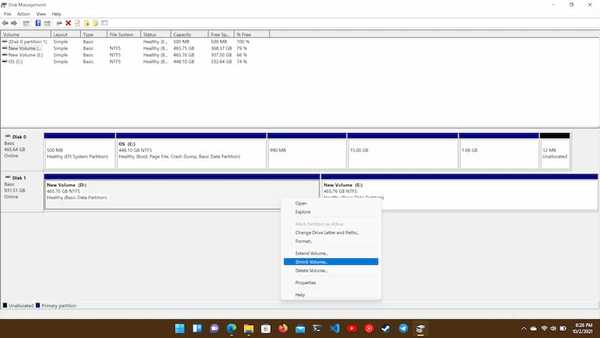
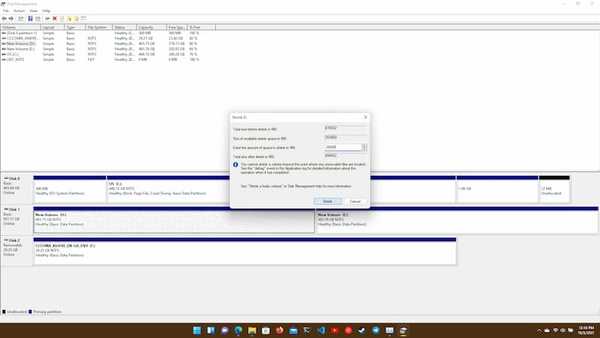
Enter the amount of space that you want for you Linux installation in the field amount of space to shrink and click shrink. For example, if you want 20GB of space for your Linux installation then multiply whatever GB you want by 1024 and enter the amount in the field. In above case 20GB \ 1024 equals 20480 MB.
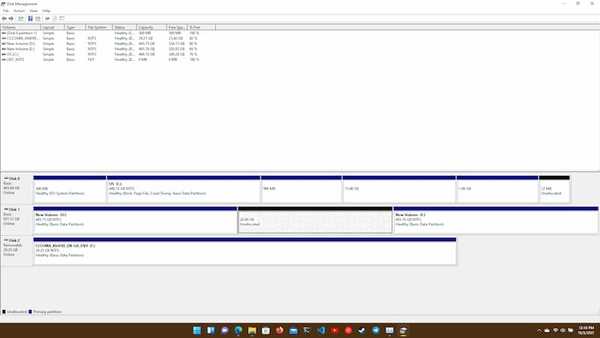
After shrinking you will see unallocated partition. Congratulations, you have just created free space for you Linux installation.
Boot from Live USB
Before booting from Live USB, check whether Secure Boot is enabled in your BIOS, if it is, disable Secure Boot before proceeding further.
To disable Secure boot, you go into your BIOS setup by pressing F2/F10 or F12 or del key at system start time. Then in your BIOS settings find Secure Boot and disable it. If you are having trouble getting into BIOS setup, please check your laptop or desktop manufacturer manual for getting into BIOS setup.
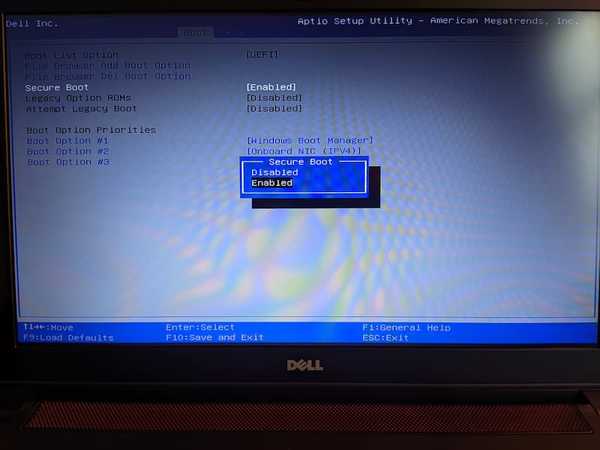
After disabling Secure Boot, again go into BIOS setup and this time select boot from USB drive. You will see something like this on the screen:
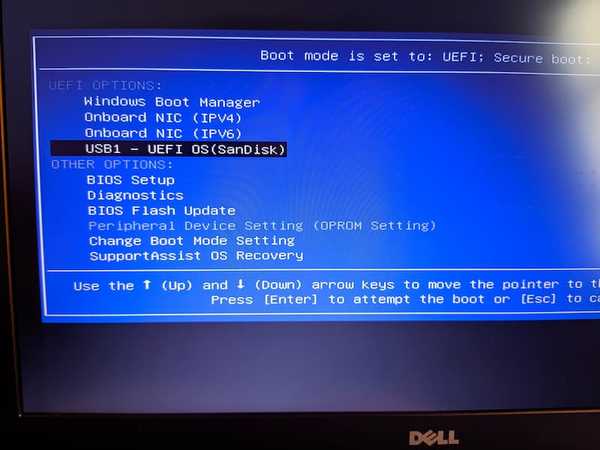
Next, select Boot from USB drive and system will start booting from installation media.
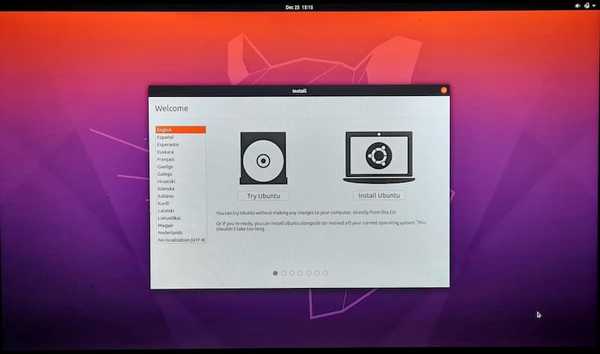
Select "Install Ubuntu" option, this will start the Ubuntu installer immediately, or, if you first want to try Ubuntu then select "Try Ubuntu without installing". The option to install Ubuntu can be found on the desktop.
Installation
- Click on install Ubuntu.
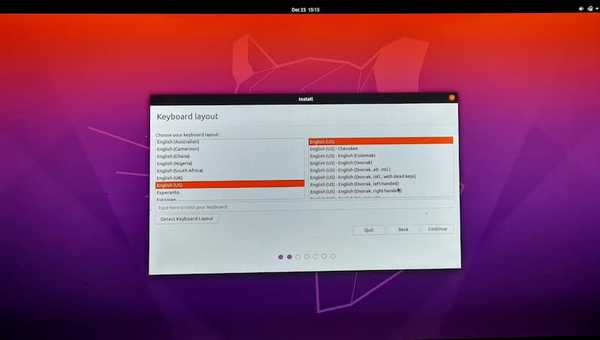
Choose your keyboard layout and click continue.
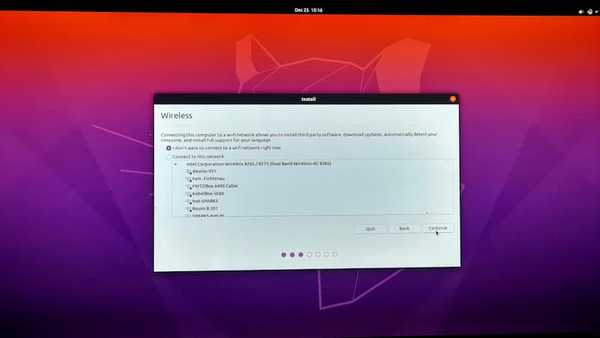
On the next screen you will be asked to connect to a Wi-Fi network. You can either connect to a network or choose "I don't want to connect to a Wi-Fi network right now".
- Next you will be asked to choose between either normal installation or minimal installation and option to install third party software for graphics and Wi-Fi hardware. Here ubuntu will ask you to configure Secure boot if you selected "install third party software for graphics and Wi-Fi hardware". Set password for Secure boot (this password is different from your login password) and is required if you install anything that might change the boot loader.
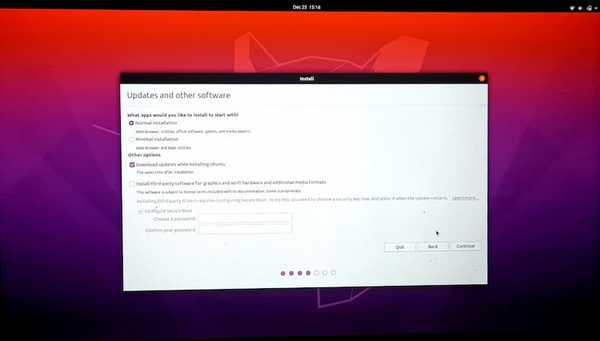
If you connected to internet on step 3, then click on "Install third party software for graphics and Wi-Fi hardware" and then proceed otherwise you can ignore this option altogether and proceed, its up-to you.
Next in the installation type you will get two options:
6.1 Install Ubuntu alongside Windows Boot Manager: This option will automatically create all the partitions required and will install the Ubuntu. Keep in mind that this option will install Ubuntu on the same disk partition on which windows is installed. So make sure your windows drive (i.e. C drive) has enough space to hold both Operating system. However, we are not going to use this option.
6.2 Erase disk and install Ubuntu: This option wipes you hard disk. Use this option if you want to only Ubuntu and want to remove Windows completely from you hard disk. This option will delete all of your hard disk data. Here our goal is to dual boot, so, we will skip it.
6.3 Something else: This is the option that we will use in this guide. This options allows you to create you to install Ubuntu on the partition of your choice. In this case, we want Ubuntu to install on the free space that we created earlier.
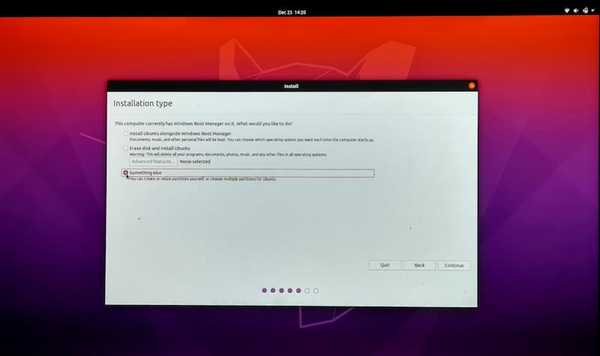
Select "Something else" option and then continue.
Next you will get a screen as shown below. Select the free space shown (this is the free space that we created earlier by shrinking the volume) and its size will be whatever you choose during shrinking of volume. Here it is showing 20GB.
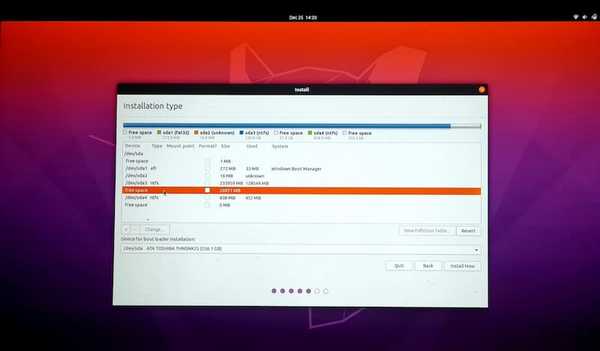
- After selecting the free space, click on the "+" sign. It will provide you with options to create Linux partition. Select the mount point to be root or "/" symbol and specify the size for the root partition (anything above 10GB is enough).
Be sure to reserve at-least 8GB from free space for the swap partition. For example, if you created 20GB as free space by shrinking volume as shown earlier, then you allocate 12GB for Root partition and the remaining 8GB we will use for swap partition, which we will get to in next step.
After that set new partition as primary and set "Use as" option to "Ext4 journaling file system", type of partition as "primary" and location for partition to "Beginning of this space" and click OK.
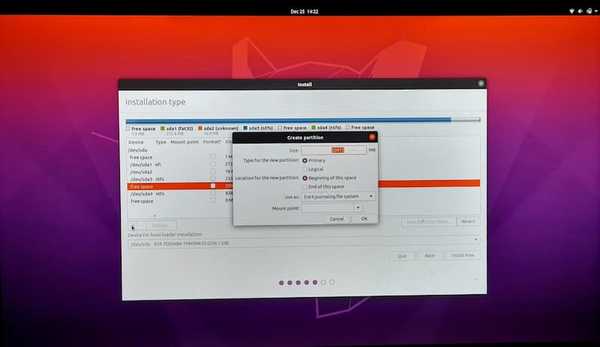
- Now, again select the remaining free space and click on "+" sign. Now, in this case set "Use as" option to "swap area", type of partition as "primary" and location for partition to "Beginning of this space" and then click OK.
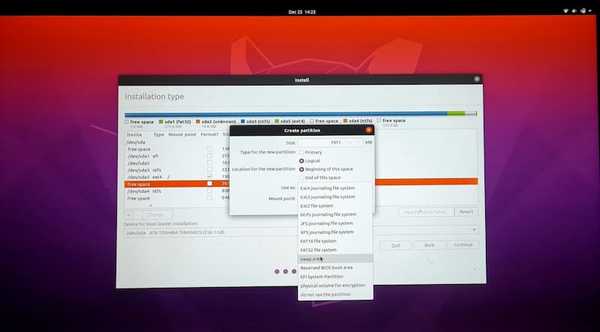
- Now for installing the bootloader, newer versions of Ubuntu will automatically detect windows bootloader and install new Grub bootloader in that partition. So, you don't need to do anything, just click "install now" and then continue.
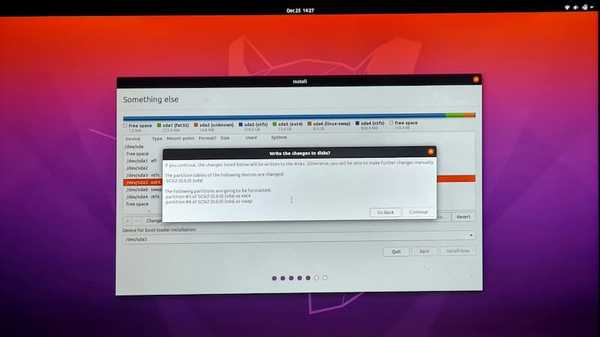
- Next you select your region and then create login password and username after that installation will begin. Now all we have to do is to wait. You can go and grab a cup of coffee.
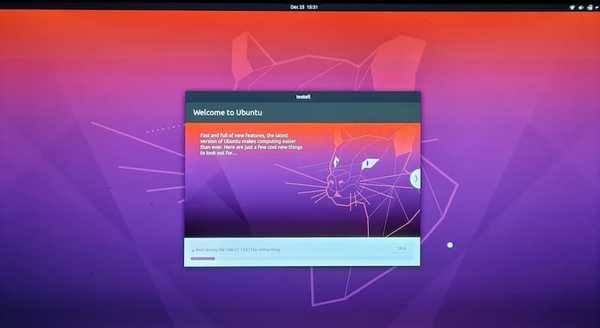
- Once installation is completed, go ahead and click Restart Now.
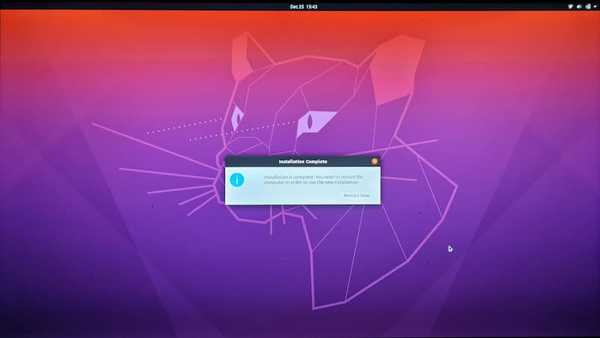
After this, you may also see a window saying remove disk and press Enter. In this case remove the USB Flash drive, press Enter.
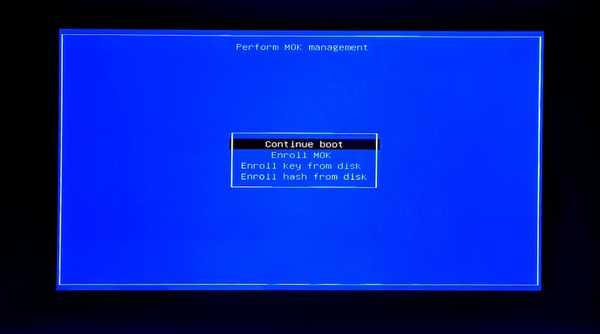
If you see something like below just select continue boot and hit enter.
- If everything goes right, you will see a screen like below.
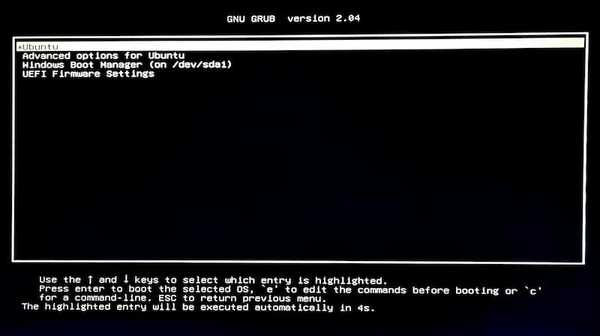
- Select Ubuntu and then you are done.
Welcome to your brand new Ubuntu installation.
Final words: Dual Boot Ubuntu alongside Windows 10
That's it. This is whole procedure of dual booting Linux alongside Windows. If you successfully have made this far without getting any errors then congratulations.
If you are stuck and don't know what to do, then feel free to drop your queries below in the comment section and we will get back to you.
